Custom Signup Forms User Guide
- Estimated 12 min read
- Last updated: January 2025
Introduction
Welcome to Custom Signup Forms, a powerful application designed to help you create, customize, and manage custom signup forms for your BigCommerce store. This application provides complete control over your customer registration experience, allowing you to design beautiful, functional forms that match your brand identity.

Whether you're collecting basic customer information or need to gather detailed data during registration, Custom Signup Forms gives you the tools to build exactly what you need. With an intuitive form builder, comprehensive request management, and customizable email notifications, you can streamline your customer onboarding process.
Note
This application integrates seamlessly with your BigCommerce store and requires proper configuration to function correctly. Ensure you have the necessary permissions and access to your store's settings.
Getting Started
Follow these steps to set up and start using Custom Signup Forms:
1. Access the Application
After installation, click on the Apps tab in the BigCommerce admin panel sidebar and select Custom Signup Forms. You'll be redirected to the Dashboard where you can get an overview of signup requests and access key features.
2. Configure Email Settings
Before creating forms, navigate to the Email section to configure your SMTP settings. This ensures email notifications are sent correctly when customers submit signup requests.
- Set up your SMTP server details (host, port, username, password)
- Configure the "From" email address and name
- Set a reply-to email address
- Test your email configuration to ensure it works properly
- Set up your SMTP server details (host, port, username, password)
- Configure the "From" email address and name
- Set a reply-to email address
- Test your email configuration to ensure it works properly
3. Create Your First Form
Go to the Form Builder to start creating your custom signup form. You can add various field types, customize the appearance, and preview your form in real-time.
4. Activate Form
Once your form is ready, you'll be redirected to the Saved Forms tab where you just need to activate it. The default signup form will automatically be replaced with your custom version.
UI Overview
The application is organized into four main sections, each designed to handle specific tasks:
Dashboard
Your central hub showing signup request statistics, recent activity, and quick access to all features.
Form Builder
Design and customize your signup forms by selecting fields from available options, with a live preview to see changes in real time.
Requests
Design and customize your signup forms by selecting fields from available options, with a live preview to see changes in real time.
Configure email settings and customize email templates for notifications sent to customers and administrators.
Dashboard Overview
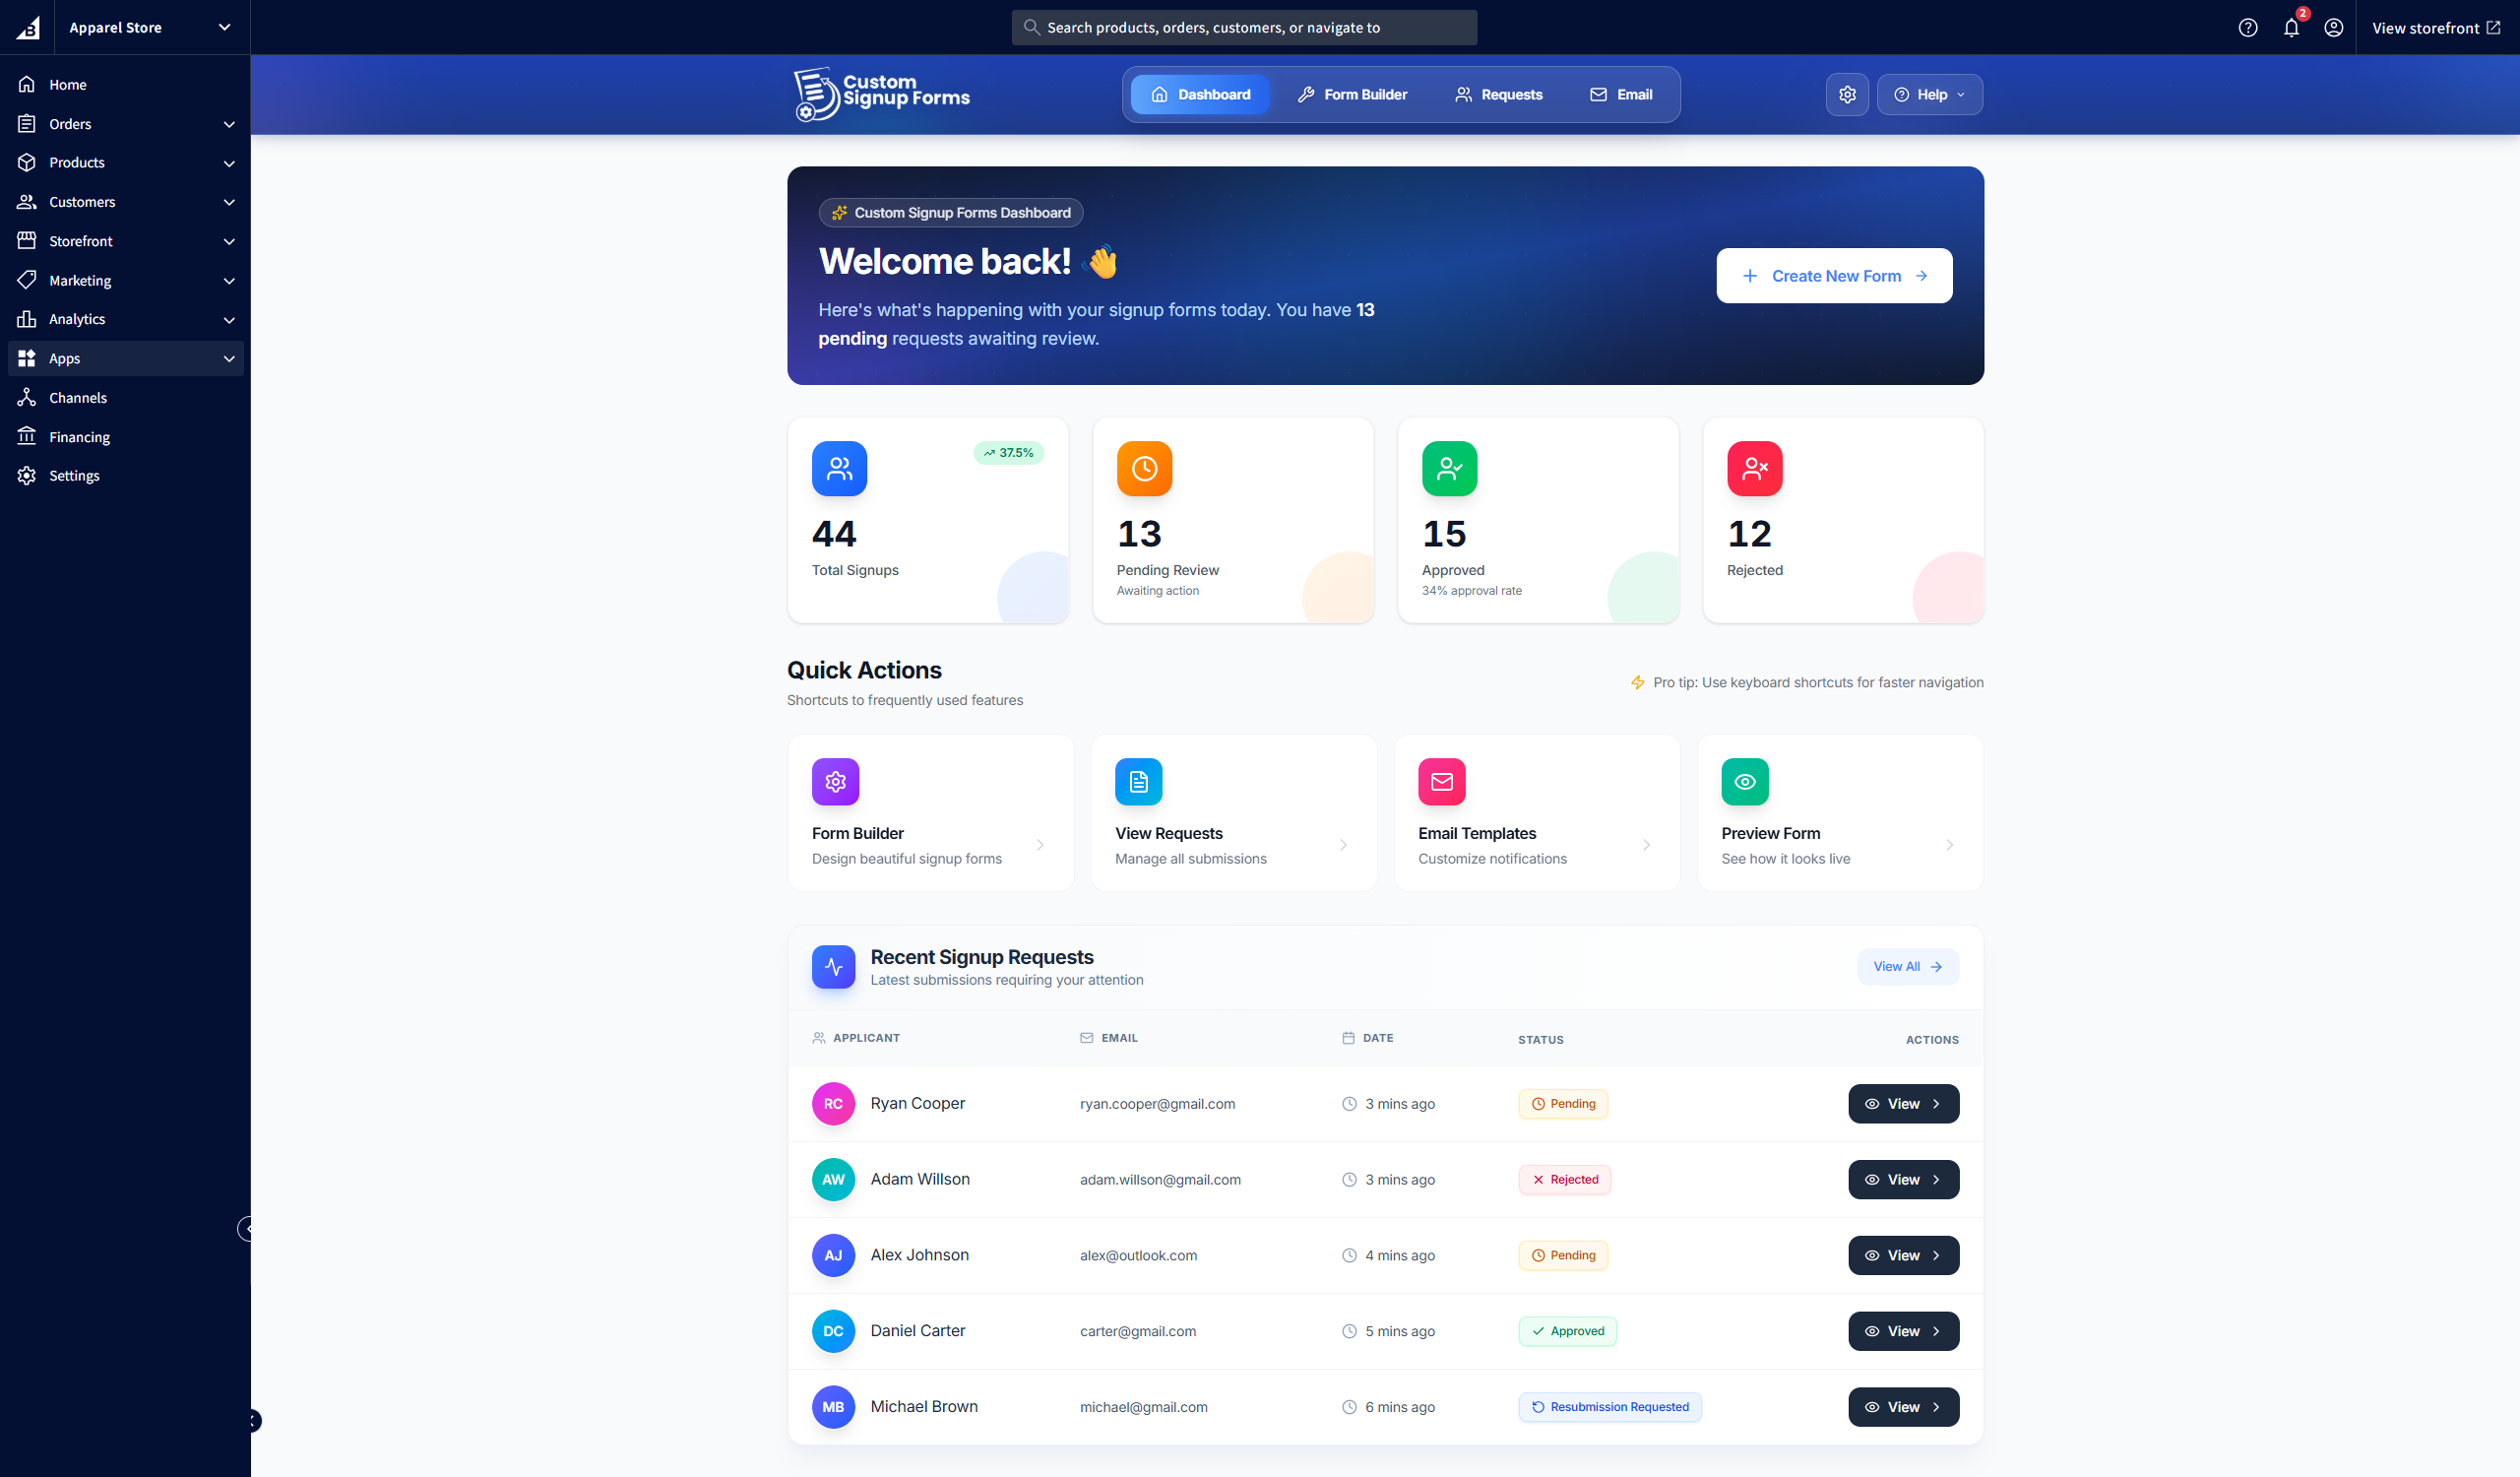
The Dashboard provides a comprehensive overview of your signup form activity.
Dashboard Components
Statistics Cards
View total requests, pending approvals, approved requests, and rejected requests at a glance. Click any card to filter requests by that status.
Recent Requests
See the most recent signup requests with quick action buttons to approve, reject, view details, or request resubmissions
Quick Actions
Access key features quickly with shortcut cards to Form Builder, Requests, Email configuration, and Form Preview.
Trend Indicators
Monitor request trends to understand submission patterns over time.
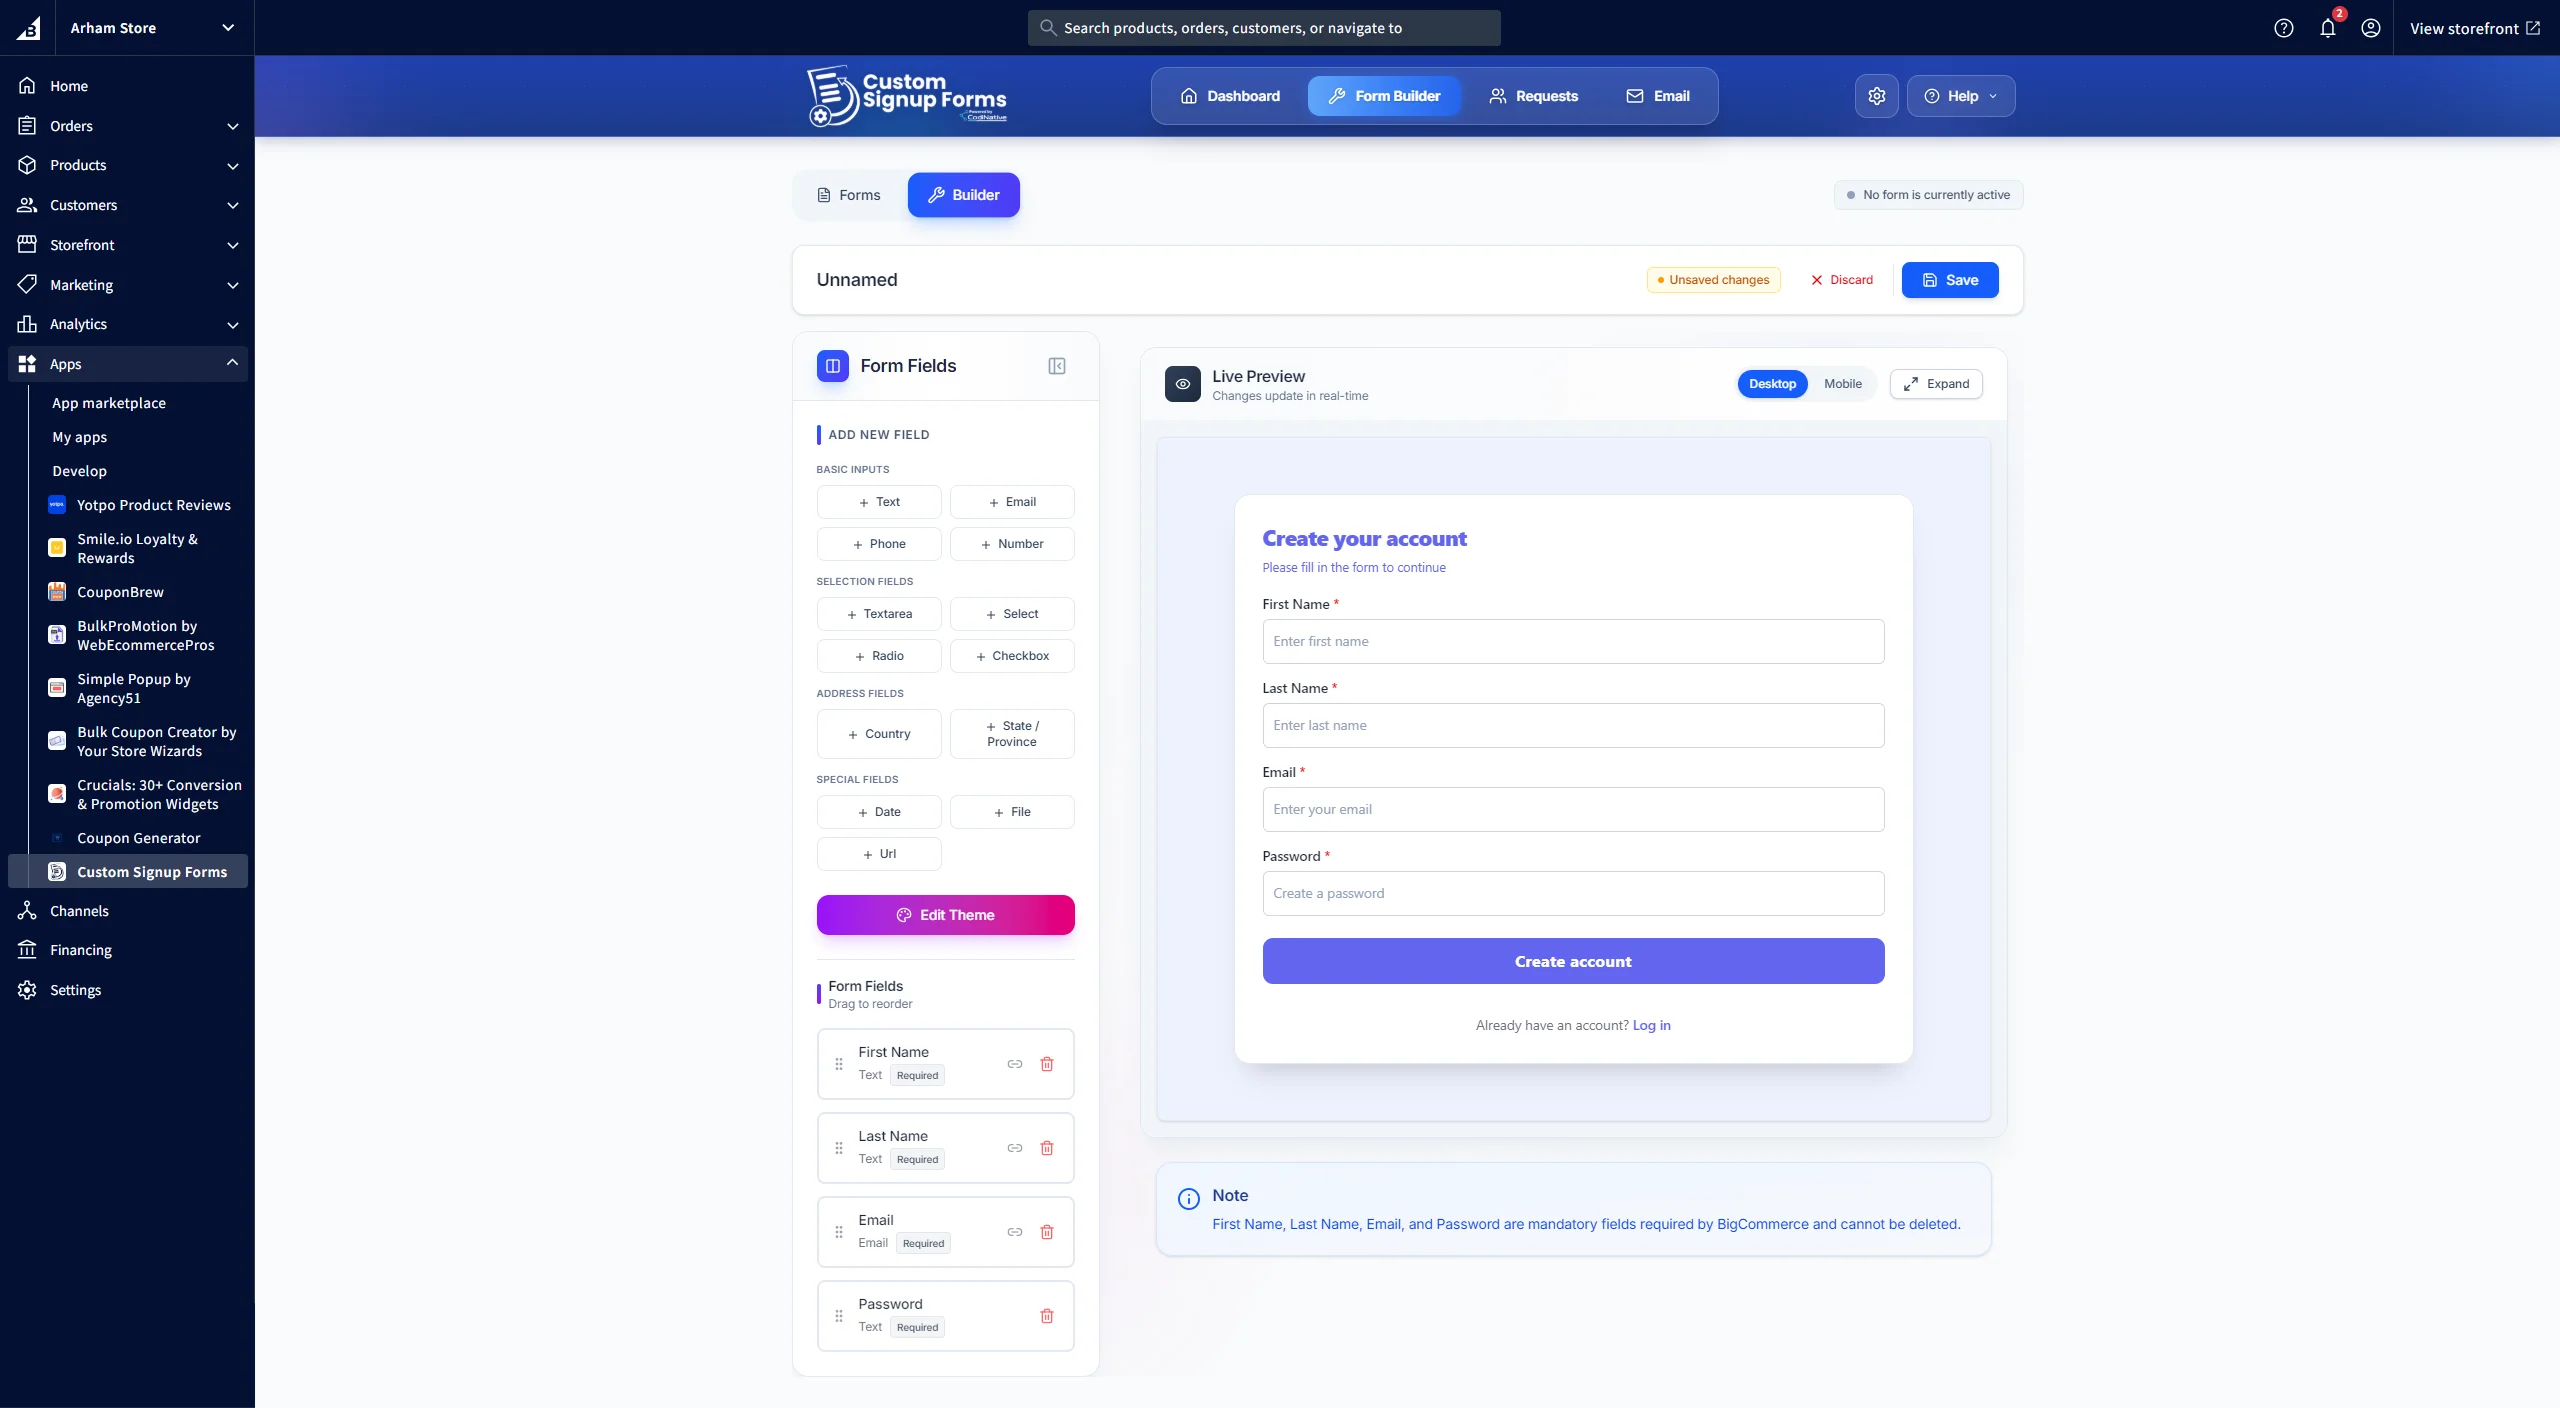
Form Builder
The Form Builder is where you create and customize your signup forms. It provides a comprehensive set of tools to design forms that match your exact requirements.
Adding & Editing Fields (Core Feature)
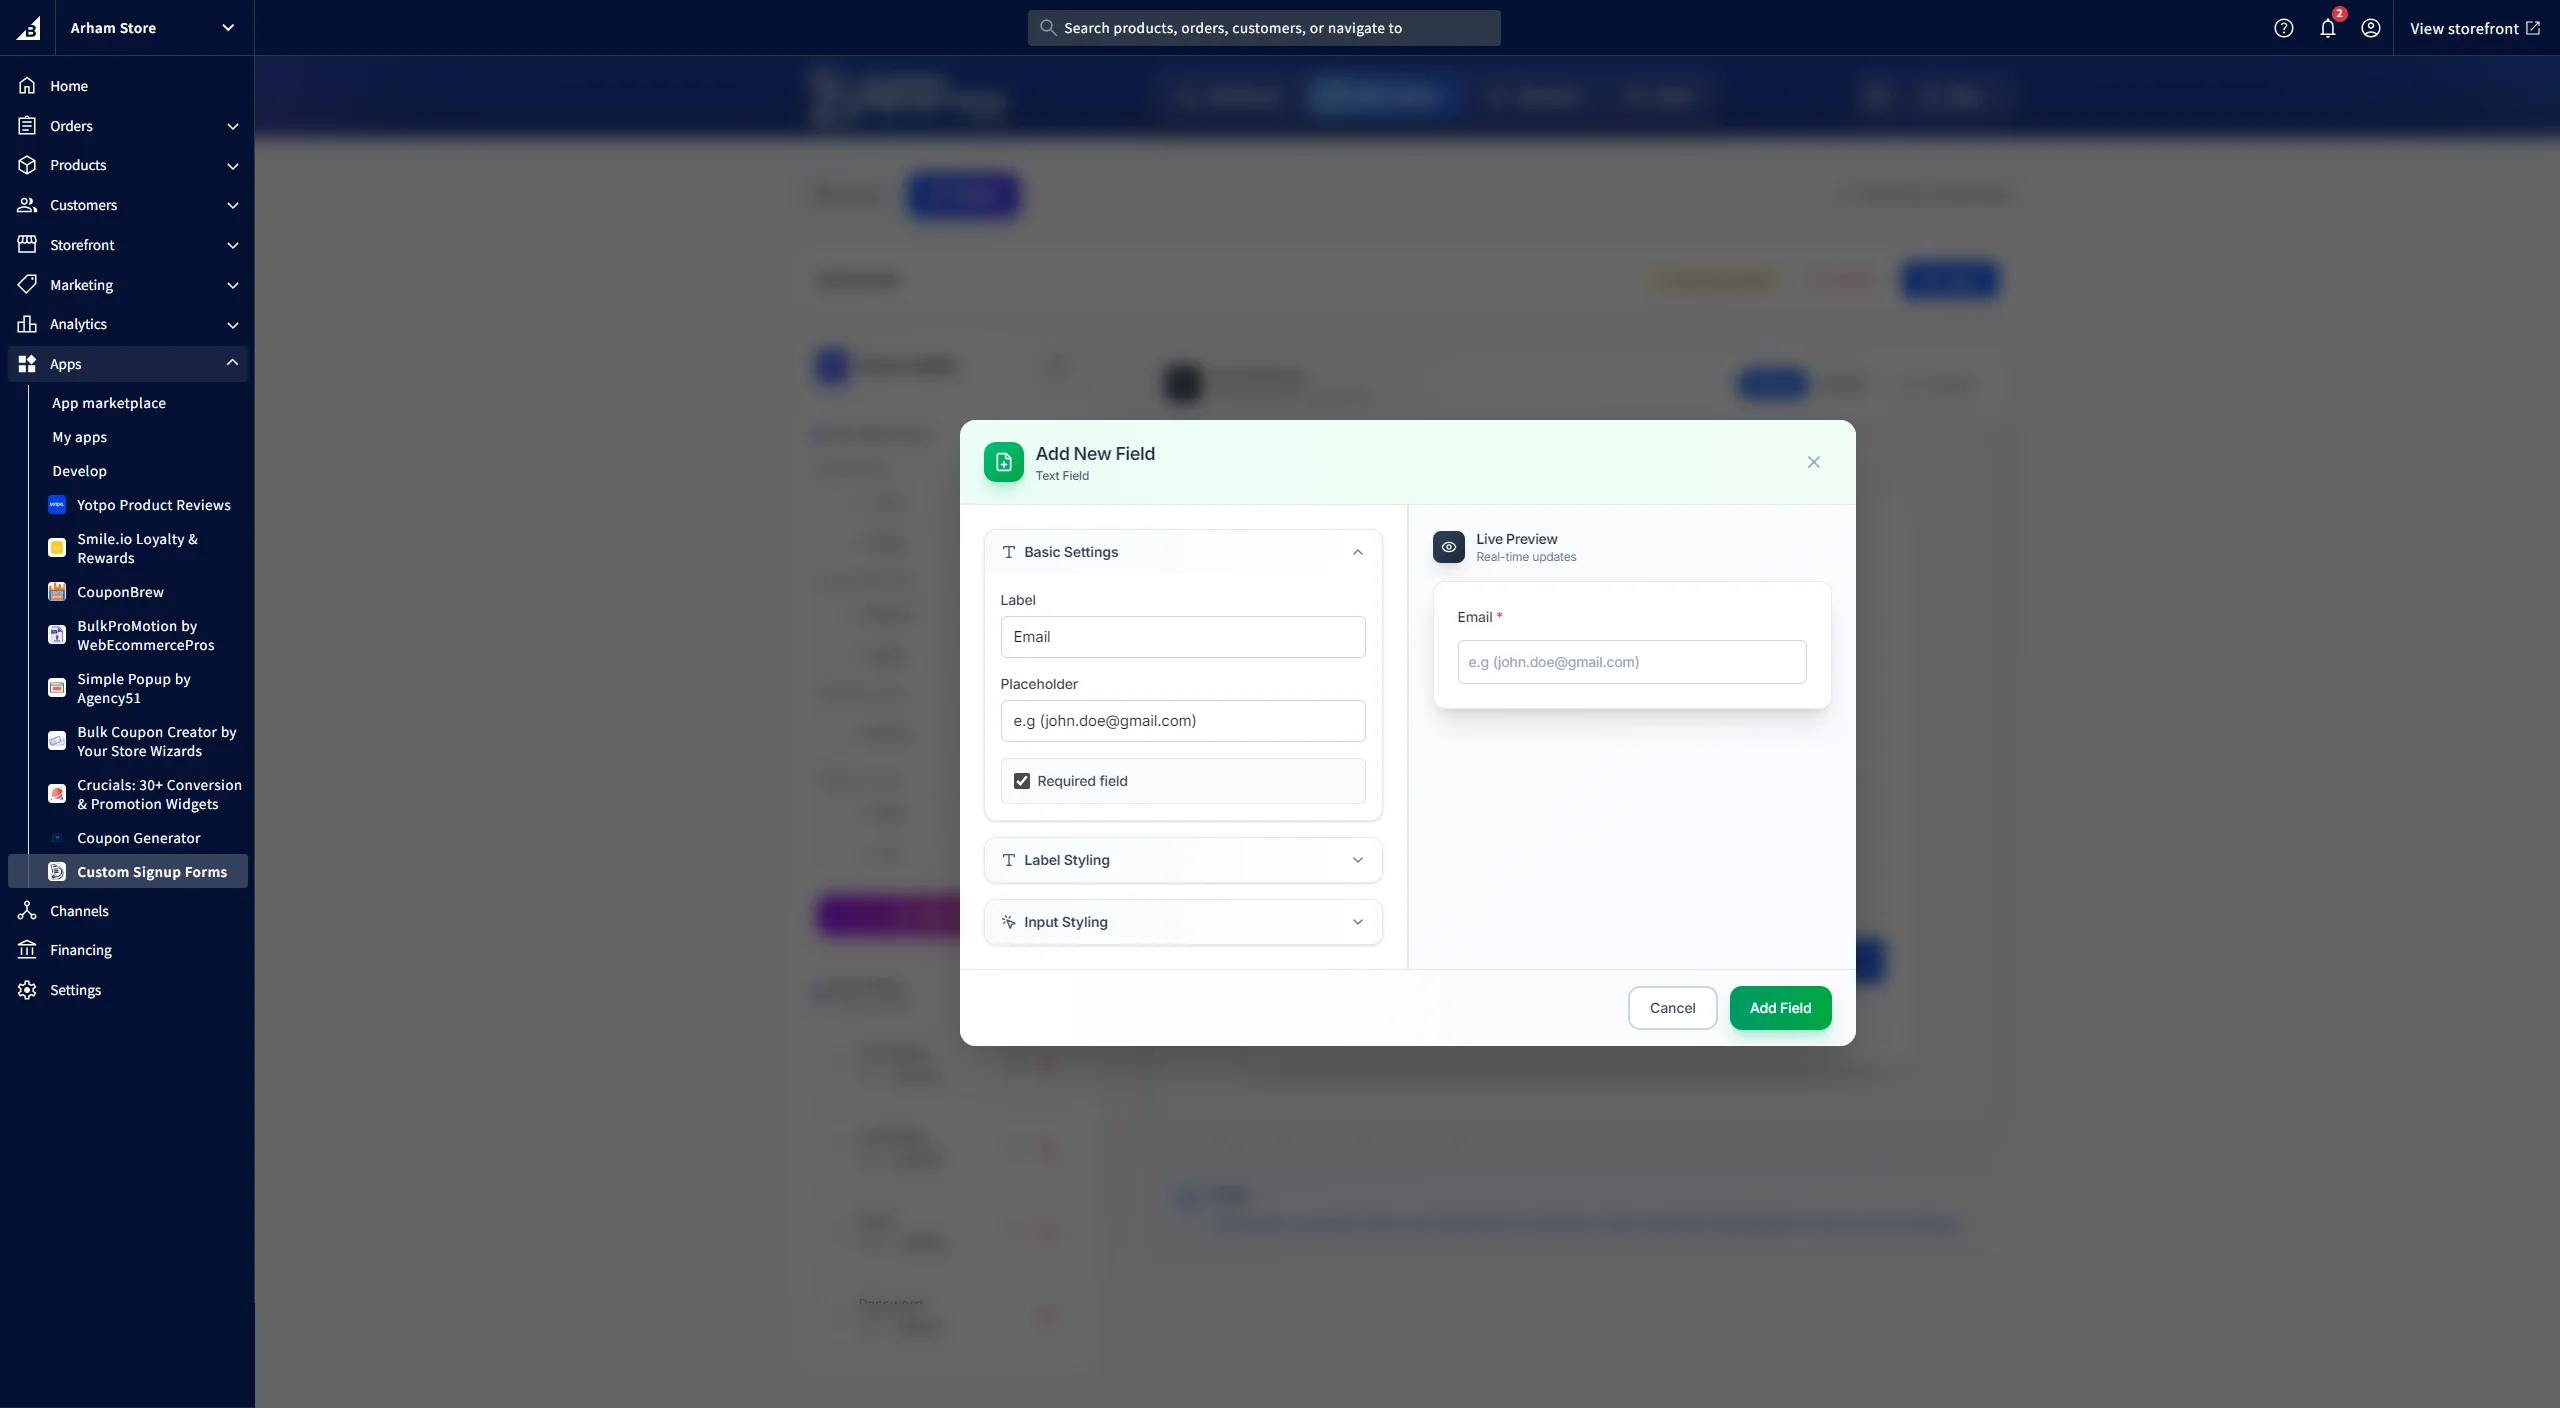
Adding Fields
Click the "Add Field" button in the sidebar to add new form fields. Available types include: text, email, phone, number, textarea, select dropdown, radio buttons, checkboxes, country, state/province, date picker, file upload, and URL fields.
Editing Fields
Click on any field in the sidebar or preview to edit its properties. Customize the label, placeholder text, make it required, and adjust styling options.
Field Pairing
Pair two fields to display side-by-side in a two-column layout. Useful for fields like "First Name" and "Last Name" or "Country" and "State/Province".
Reordering
Drag and drop fields in the sidebar to reorder them. The sidebar order determines the form display order.
Deleting Fields
Click the delete icon next to any field to remove it from your form.
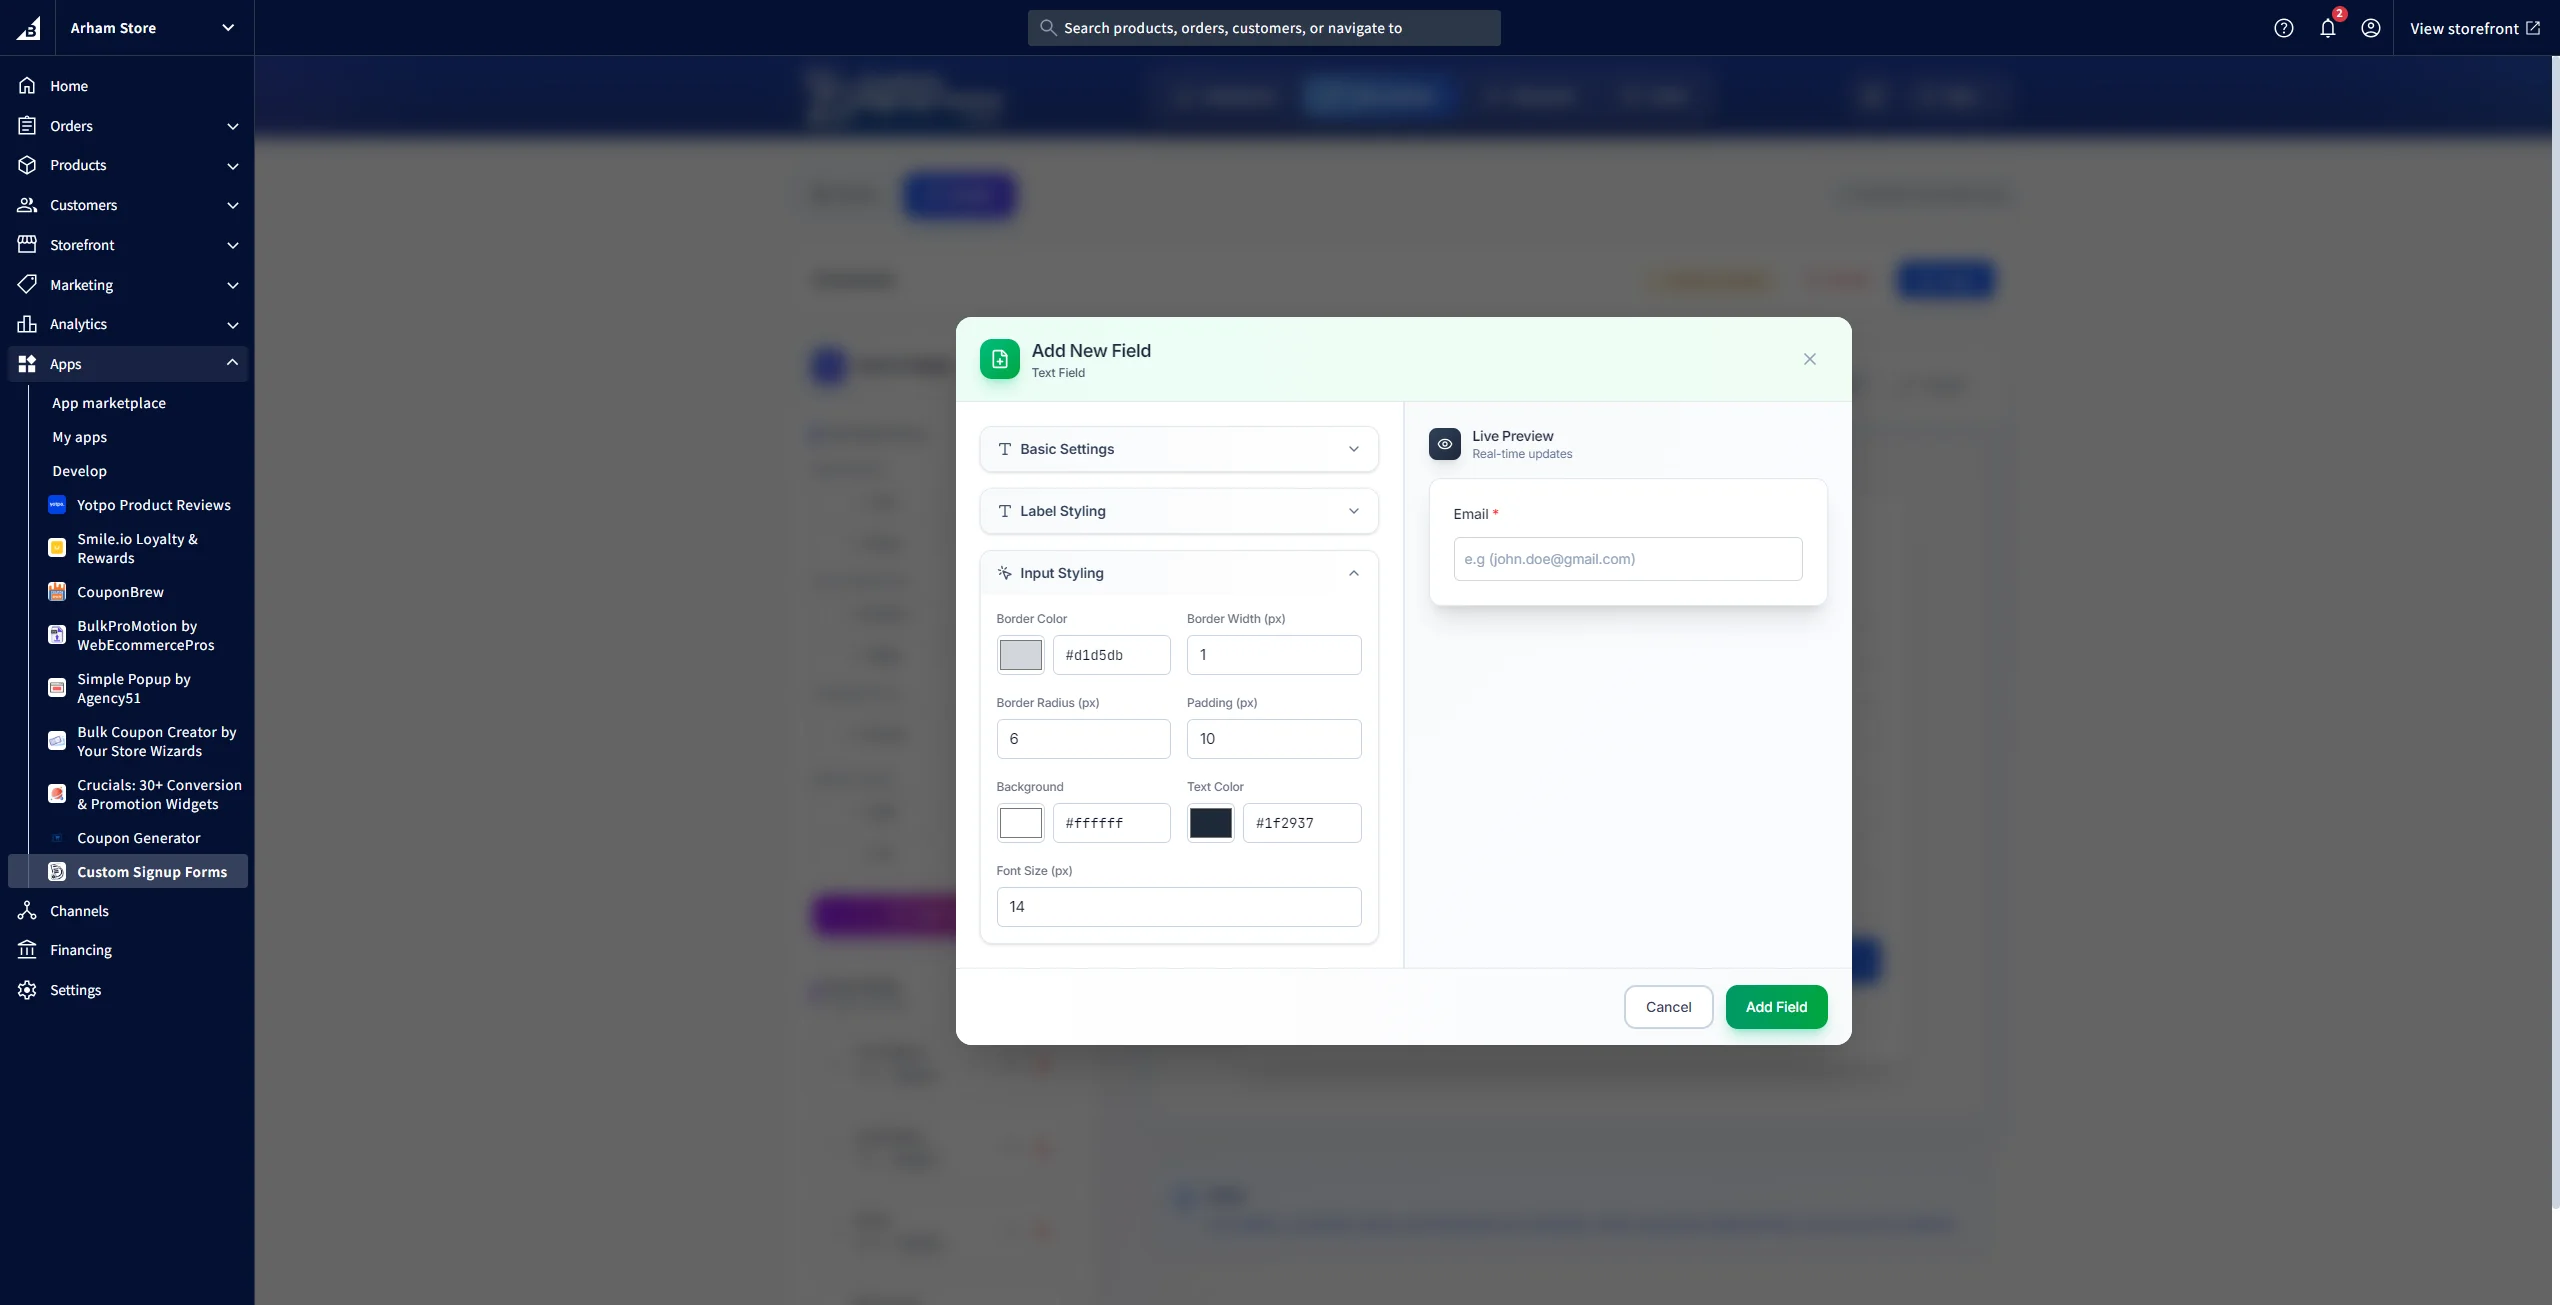
Field Styling Options
Label Styling
Customize label color, size, and font weight.
Border Options
Set border color, width, and radius for field inputs.
Background & Padding
Configure background color and padding for each field.
Text Styling
Adjust text color and font size for input values.
Theme Customization
Click the "Edit Theme" button to customize the overall form appearance:
Title & Subtitle
Set form title and subtitle with custom colors and fonts.
Primary Color
Define the primary color scheme used throughout the form.
Layout Options
Choose between centered layout or split-screen with image.
Button Styling
Customize button text, colors, and border radius.
Background Colors
Set background colors for form container and page.
Preview & Saving
Live Preview
The preview panel shows exactly how your form will appear to customers. Toggle between desktop and mobile views to ensure responsiveness.
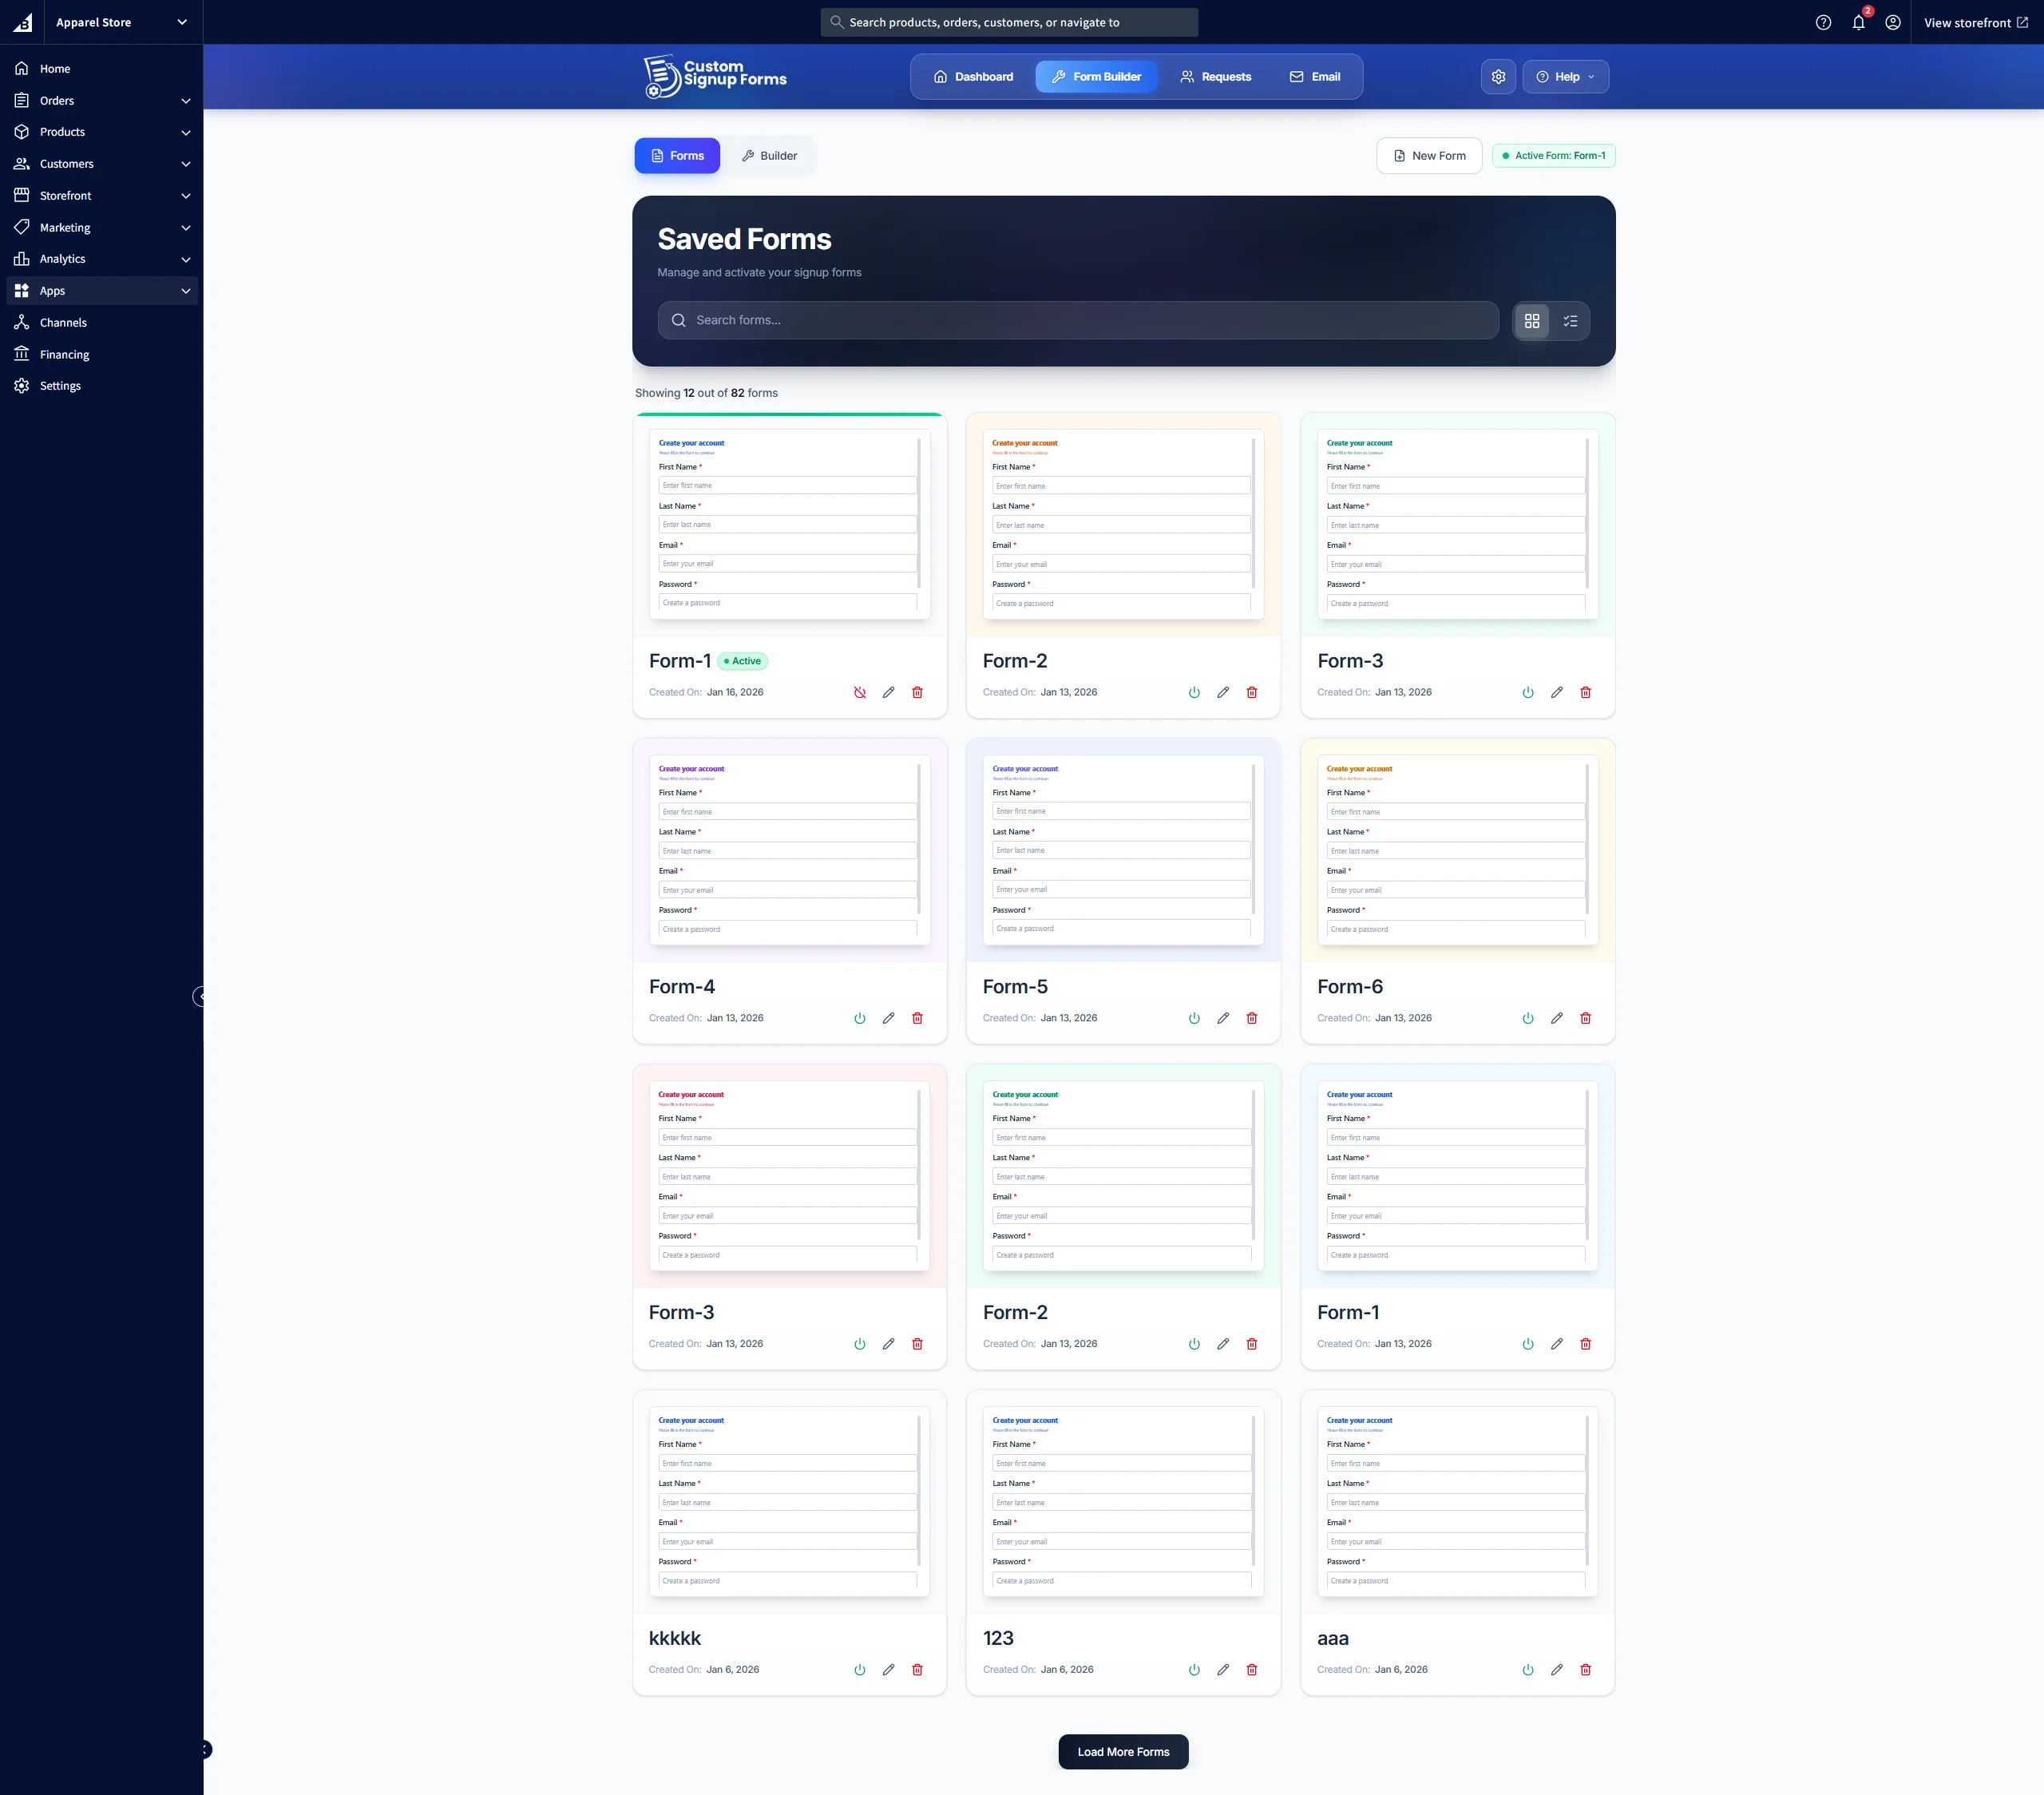
Saving Forms
Click "Save Form" to save your work. You can save as a new form or update an existing one. Saved forms are stored as versions.
Form Versions
Access the "Forms" tab to view all saved versions. You can load, activate, or delete versions as needed.
Activate Form
Once complete, just activate the custom form replacing the default signup form.
Managing Signup Requests
The Requests section allows you to manage all customer signup submissions efficiently.
Request Management Actions
Viewing Requests
All signup requests are displayed in a table with key information including customer namee, customer email, submission date, and status (Pending, Approved, Rejected, or Resubmission Requested).
Filtering
Use the status filter to view requests by current status. Search functionality is also available for finding specific requests.
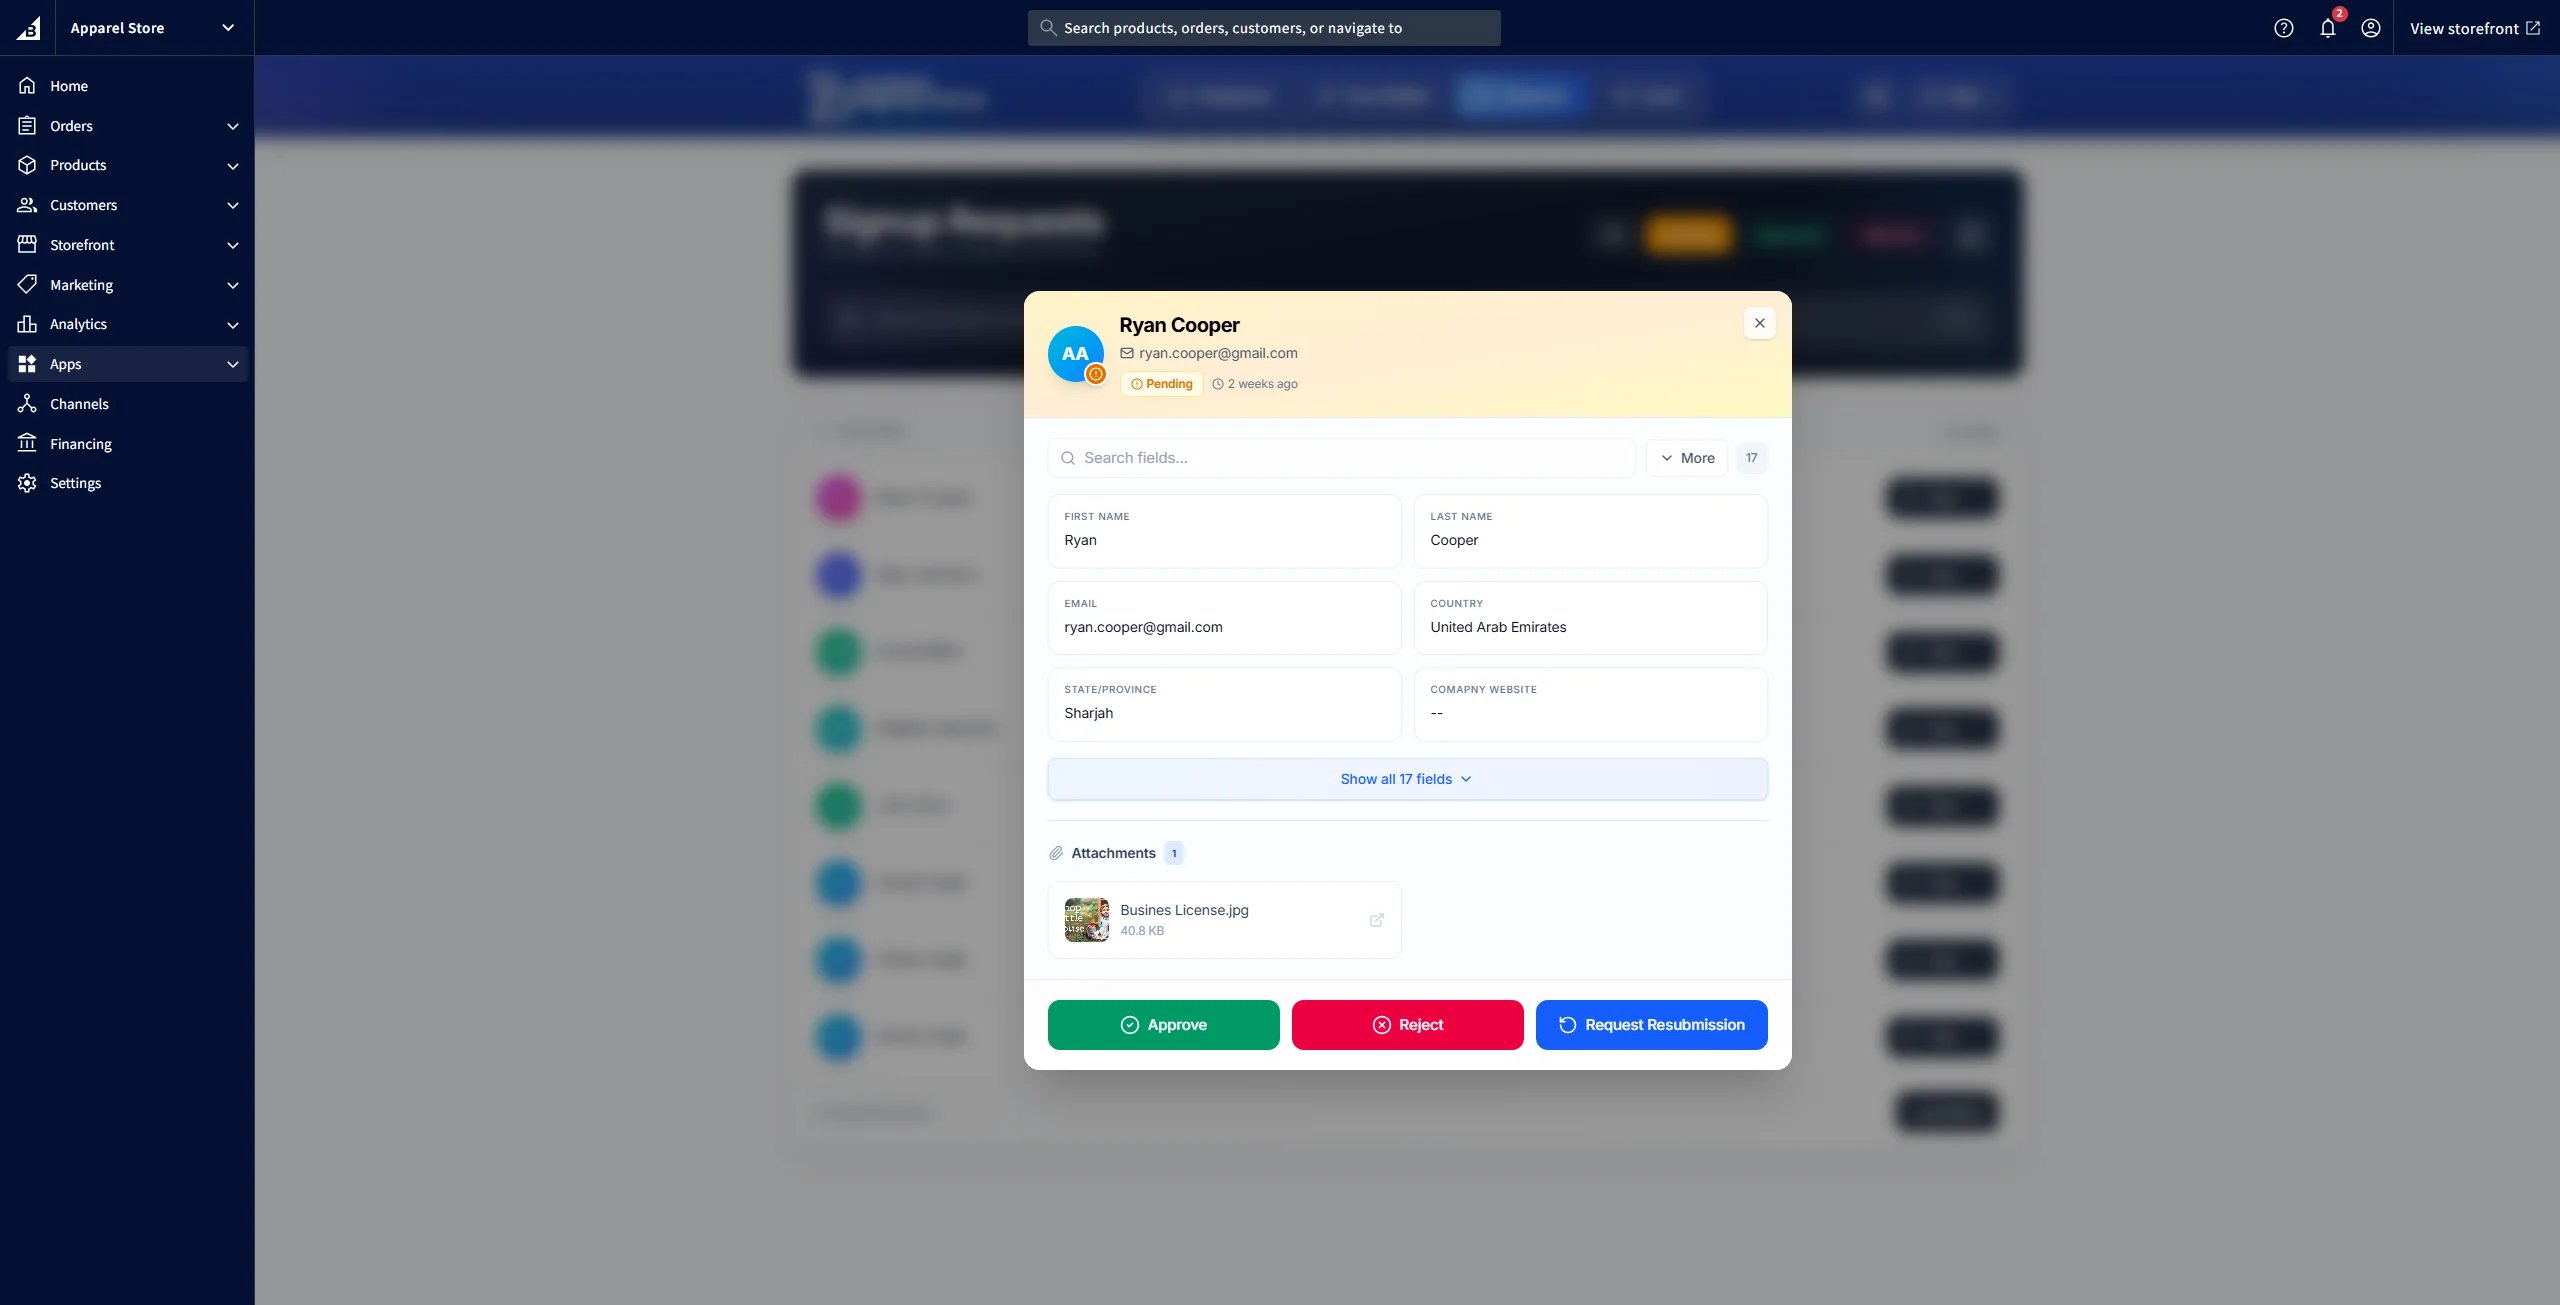
Viewing Details
Click on any request to view complete details including all form field data and uploaded files.
Approving
Approve requests with an optional assigning customers to customer groups. Approved requests are marked as approved.
Rejecting
Reject requests that don't meet criteria.
Request Resubmission
Request resubmissions from customers by mentioning the fields which need corrections, in the email.
Cooldown Period
The system prevents duplicate submissions. You can manually reset the cooldown for a specific email address if needed.
Email Configuration
Configure email settings to enable notifications for customers and administrators.
SMTP Configuration
SMTP Settings
Host
Enter your SMTP server host (e.g., smtp.gmail.com)
Port
Set the port number (commonly 587 for TLS or 465 for SSL)
Username
Enter your SMTP account username
Password
Enter your SMTP account password
Secure Connection
Enable if required by your email provider
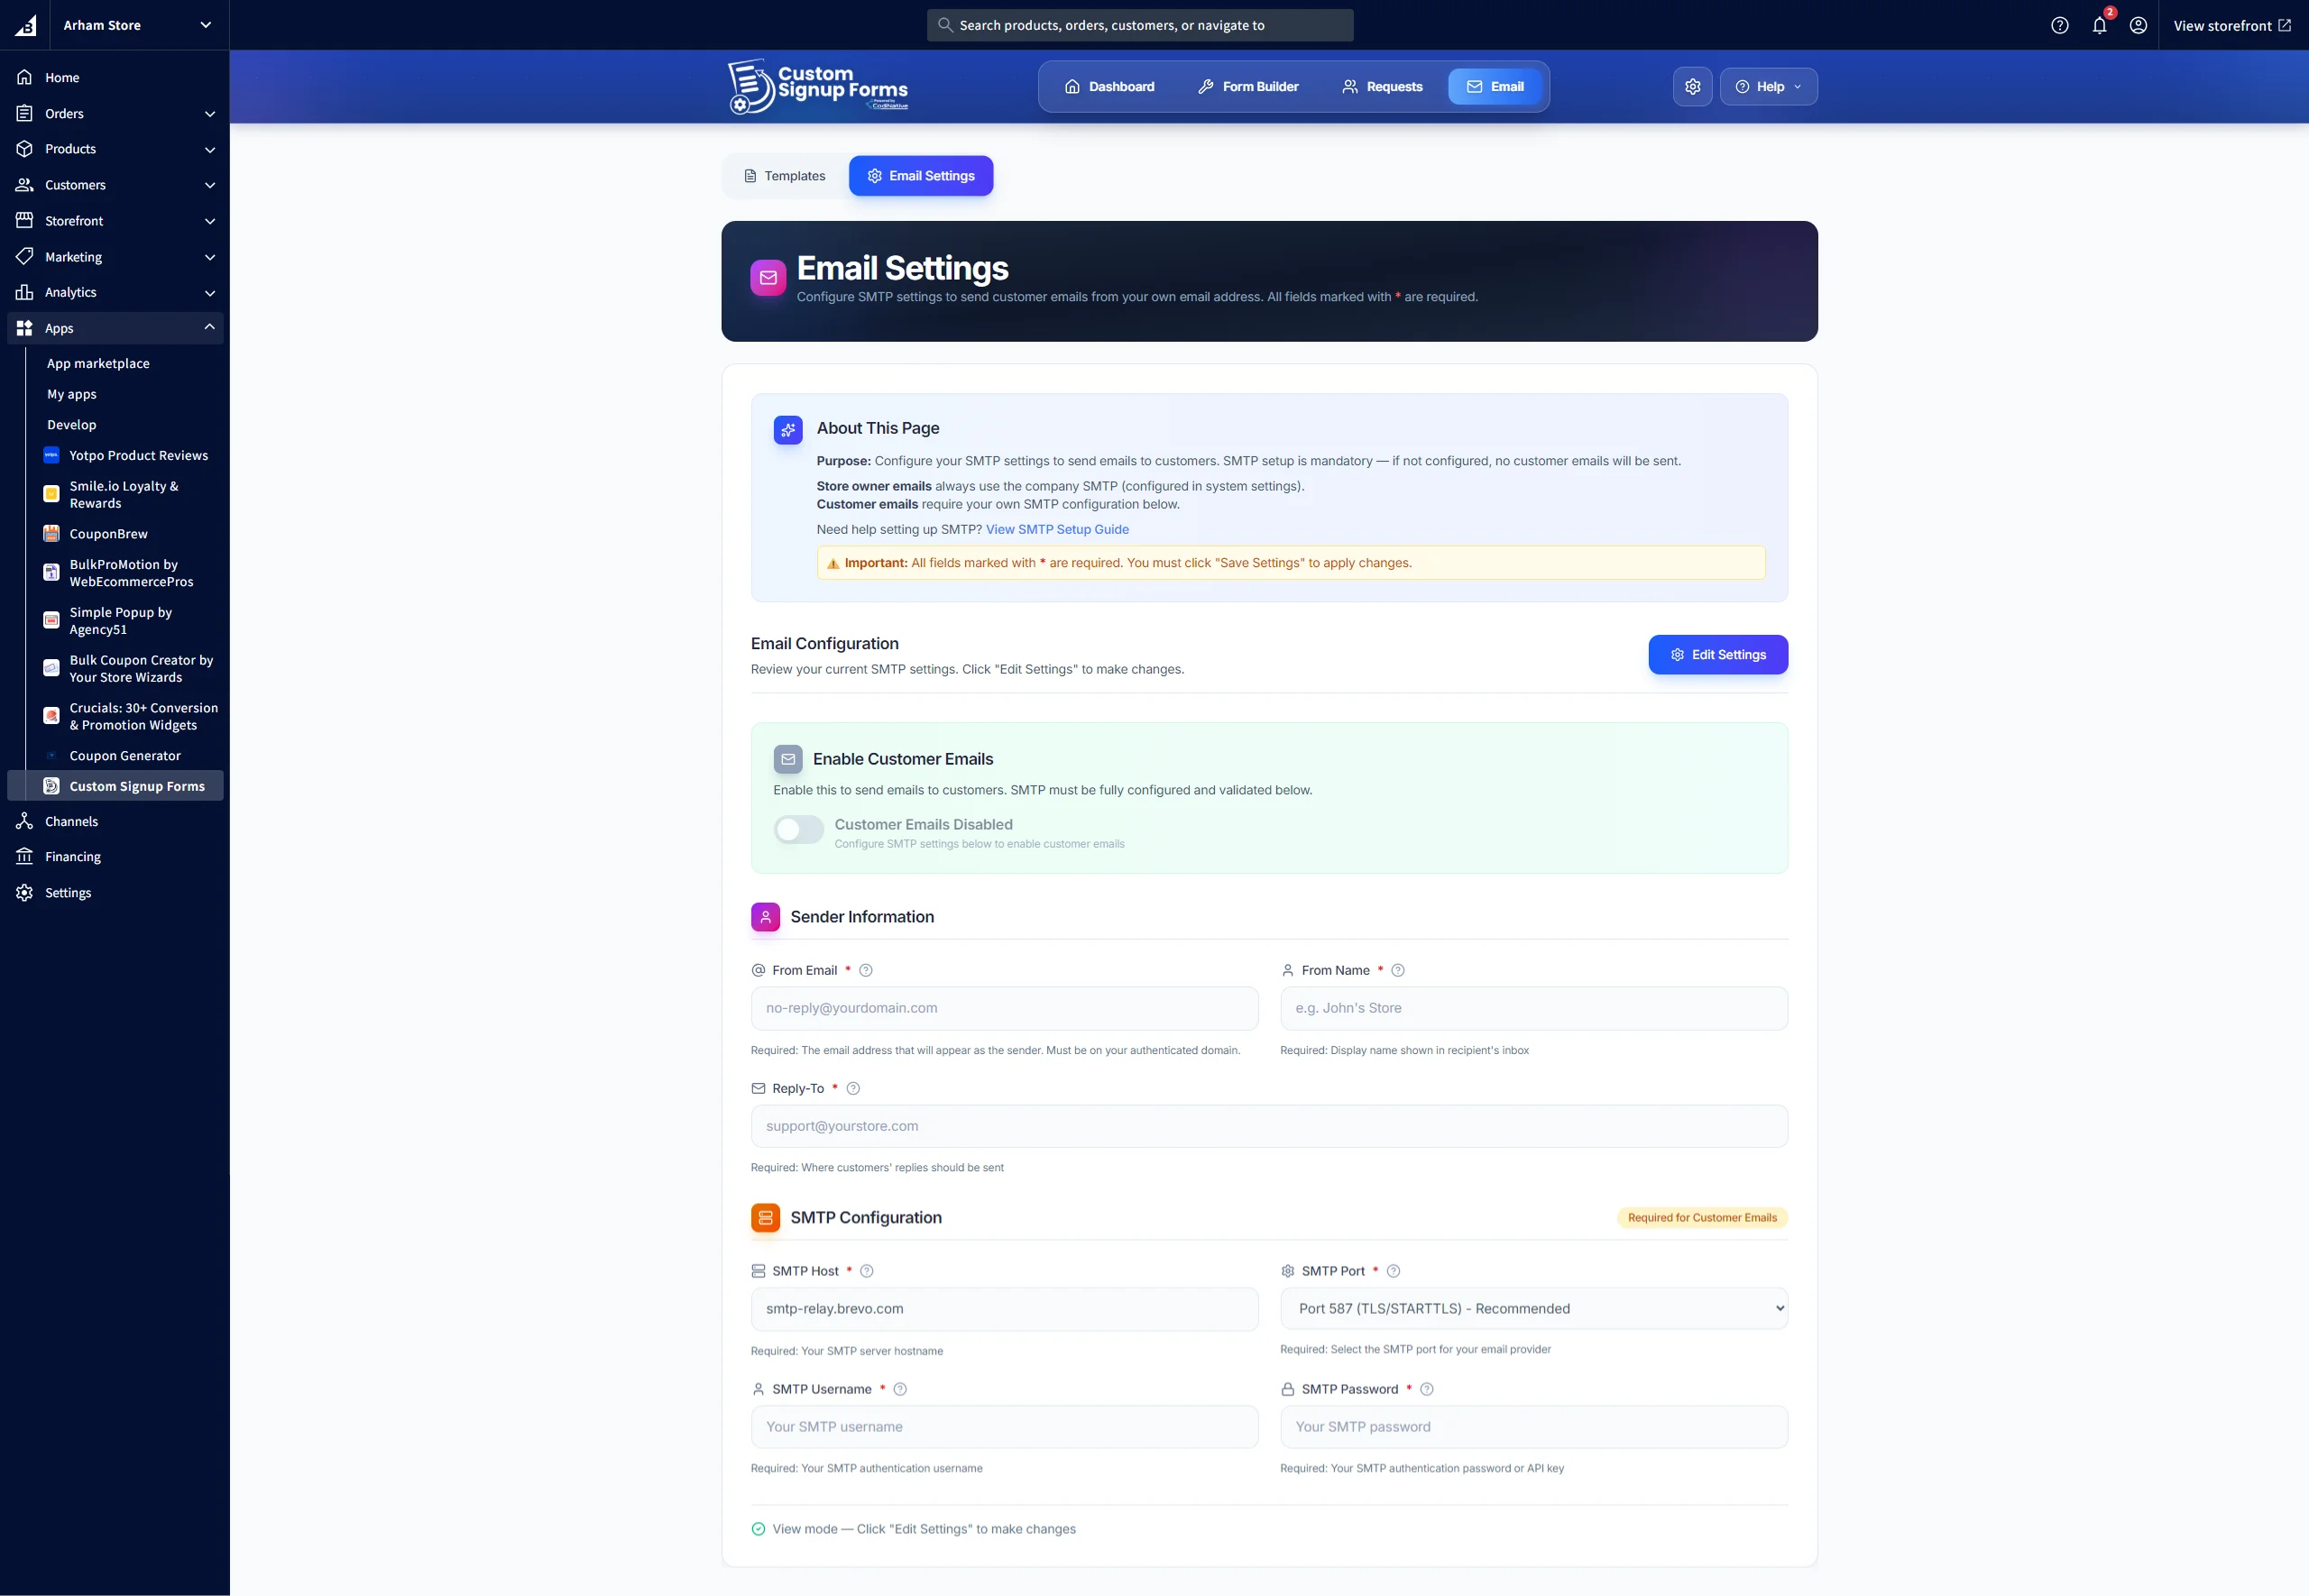
Email Settings
Sender Configuration
From Email
Set the "From" email address (must match your SMTP account)
Display Name
Set a display name for outgoing emails
Reply-To Address
Configure a reply-to email address for customer responses
Test Email
Use the test feature to verify your configuration before going live
Email Templates
Customize templates for approval, rejection, and resubmission notifications
FAQs & Troubleshooting
My form isn't appearing on my BigCommerce store. What should I check?
- Make sure the application is installed
- Confirm your form is activated in the Form Builder
- Test on the correct URL: login.php?action=create_account
- Clear your browser cache
- Try creating a new form and activate it
- Confirm your form is activated in the Form Builder
- Test on the correct URL: login.php?action=create_account
- Clear your browser cache
- Try creating a new form and activate it
Why aren't email notifications being sent?
- Verify SMTP configuration is complete and correct
- Ensure email settings are saved and enabled
- Test email functionality works using the test feature
- Check if your email provider is blocking the connection (check spam folders)
- Verify firewall or security settings aren't blocking SMTP connections
- Ensure email settings are saved and enabled
- Test email functionality works using the test feature
- Check if your email provider is blocking the connection (check spam folders)
- Verify firewall or security settings aren't blocking SMTP connections
Can I have multiple forms active at once?
No, only one form can be active at a time. When you activate a new form, it automatically deactivates the previous one. This ensures consistency in your customer registration experience.
What file types can customers upload?
- Maximum file size: 10MB per file
- Supported formats: Images (JPG, PNG, GIF), Documents (PDF, DOC, DOCX), and other common file types
- Multiple files can be uploaded if you add multiple file fields to your form
- Supported formats: Images (JPG, PNG, GIF), Documents (PDF, DOC, DOCX), and other common file types
- Multiple files can be uploaded if you add multiple file fields to your form
How do I restore a previous version of my form?
Go to the Form Builder and click on the "Forms" tab. You'll see all saved versions of your forms. Search the version you want to restore. Just click on the power button on the form card, the version will be activated and restored successfully
The form preview looks different on mobile. How can I fix this?
Use the mobile preview toggle in the Form Builder to see how your form appears on smaller screens. Consider:
- Reducing font sizes for mobile
- Adjusting padding and spacing
- Using single-column layouts for mobile (paired fields automatically stack)
- Testing with the mobile preview before publishing
- Reducing font sizes for mobile
- Adjusting padding and spacing
- Using single-column layouts for mobile (paired fields automatically stack)
- Testing with the mobile preview before publishing
Can I customize the validation messages?
Currently, validation messages use default text. However, you can customize field labels and placeholders to provide clearer guidance to users. Required fields are automatically marked with an asterisk (*) and validated on submission.
What happens if a customer submits a duplicate request?
The system includes a cooldown period to prevent duplicate submissions from the same email address. If a customer tries to submit again too soon, they'll receive an error message. You can manually reset the cooldown period for a specific email address in the Requests section if needed.
Best Practices
Form Design
- Keep forms concise—only ask for essential information
- Use clear, descriptive labels for all fields
- Group related fields together (name fields, address fields)
- Mark required fields clearly with asterisks
- Test on both desktop and mobile before going live
- Match your form's color scheme to your brand
- Use appropriate field types (email for emails, phone for numbers)
Request Management
- Review and respond to requests promptly
- Use clear, professional messages for all responses
- Regularly clean up old or unnecessary requests
- Monitor request trends to identify patterns
- Keep detailed records for compliance purposes
Email Configuration
- Always test email configuration before going live
- Use a professional "From" name and email address
- Set up a dedicated reply-to address
- Keep email templates clear and professional
- Regularly verify emails are being delivered
- Consider a dedicated email service for better deliverability
Security & Privacy
- Only collect necessary information
- Ensure compliance with GDPR, CCPA, etc.
- Protect sensitive customer data
- Regularly review forms to remove unnecessary fields
- Keep application and dependencies up to date
- Use secure SMTP connections (TLS/SSL)
Performance Tip
Limit the number of fields to what's necessary to avoid long forms. Optimize images used in split-screen layouts and regularly archive old form versions to keep your workspace clean.
Support & Contact Information
If you need assistance, have questions, or encounter any issues while using Custom Signup Forms, we're here to help.
Contact Support
For support inquiries, feature requests, or bug reports, please contact us at info@codinative.com’. Don't forget to add:
- A clear description of the issue or question
- Steps to reproduce the problem (if applicable)
- Screenshots or error messages (if available)
- Your application version (shown in Help dropdown)
- Browser and device information